SpliceSeq
| Overview | |
| Description | A tool for investigating alternative mRNA splicing in next generation mRNA sequence data |
| Development Information | |
| Language | Java |
| Current version | 2.1 |
| Platforms | Platform independent |
| License | Freely available for academic and commercial use |
| Status | Active |
| Last updated | February 21, 2014 |
| References | |
| Citation | Ryan, M. C., Cleland, J., Kim, R.G., Wong, W. C., Weinstein, J. N., SpliceSeq: a resource for analysis and visualization of RNA-Seq data on alternative splicing and its functional impacts, Bioinformatics 28 (18) p.2385 (2012). https://doi.org/10.1093/bioinformatics/bts452 |
| Help and Support | |
| Contact | MDACC-Bioinfo-IT-Admin@mdanderson.org |
Installation Overview
SpliceSeq is comprised of three components, SpliceSeq Viewer, SpliceSeq DB, and SpliceSeq Analyzer. SpliceSeq Viewer is a Java-based application which can be installed and run on your local machine. SpliceSeq DB is a MySQL database which contains the gene structures and sample read statistics. The SpliceSeq Viewer accesses the SpliceSeq DB to retrieve splicing analysis results. SpliceSeq Analyzer performs alignment and analysis of RNASeq data and loads the results into the SpliceSeq DB. When SpliceSeq Viewer alone is installed and launched without your own SpliceSeq DB installed, you can still browse data from our server or from a colleague’s database to which you have access.
Installing and Running SpliceSeq Viewer
SpliceSeq Viewer is a JavaTM application that runs on Windows, Linux, or Mac OS X. A 64 bit version of Java may be required if you plan on performing analysis of large RNASeq files.
NOTE we no longer provide launching the SpliceSeq application directly from this page. Support for Java Web Start was removed from the Java Platform as of Java 11 in 2018.
See the “Local Installation and Running” section for instructions on installing SpliceSeq locally.
The default SpliceSeq DB is also no longer accessible online. You can change a configuration setting to open other SpliceSeq DBs or use your own SpliceSeq DB on your local machine.
Local Installation and Running
If you prefer downloading SpliceSeq Viewer and installing it locally, download the SpliceSeq.zip version 2.1 file from here:
Unzip the contents of this file to a directory where you would like the software to be (e.g. C:\SpliceSeq). NOTE: If you have a previous version of SpliceSeq Viewer, please install the new version into a new directory or delete the old version if installing to the same directory. To run SpliceSeq Viewer, double click on SpliceSeq.jar or open a Dos/Unix window, cd to the directory where you unpacked the application and run:
java -jar SpliceSeq.jar
Configuring SpliceSeq Viewer to Access the SpliceSeq DB
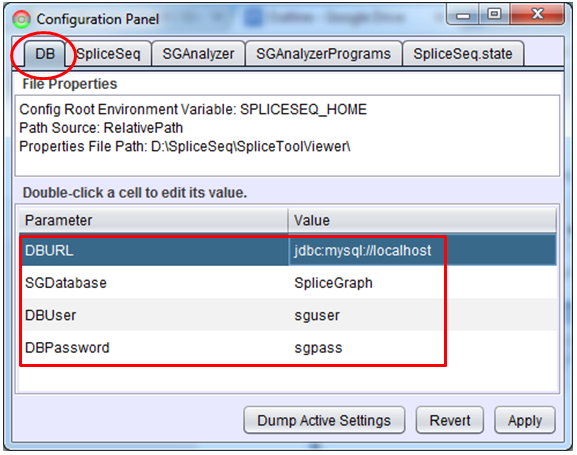
By default, the SpliceSeq Viewer application will connect to our preloaded SpliceSeq DB. To connect to a different SpliceSeq DB, open the Configuration Panel that is in the menu bar under the File heading. You can edit items on this panel by double clicking on the value you want to change, typing in a new value, and then hitting Enter. There are 4 items that you may need to edit on the DB tab:
DBURL – This is the DB connect string and contains the URL to get to the database server (for example, jdbc:mysql://localhost for a database on the machine where SpliceSeq Viewer is installed or jdbc:mysql://server:3306 to connect to another server through a specific port).
SGDatabase – This is the name of the SpliceSeq DB on the server. Default is SpliceGraph. Note: Windows sometimes forces database names to be in lower cases, so if ‘SpliceGraph’ does not work try ‘splicegraph’.
DBUser – MySQL user ID for connecting to the SpliceSeq DB.
DBPassword – MySQL password for connecting to the SpliceSeq DB.
Note: You must click ‘Apply’ after changing the DB settings.
To create and load your own SpliceSeq DB, see instructions on Installing and Loading SpliceSeq DB below.
Creating and Initializing SpliceSeq DB
If you plan to analyze your own RNASeq samples, you will need a SpliceSeq database. The database and sample analysis can be done on a user workstation if it is fairly powerful (64 bit OS, with 8+ Gig of RAM) or on a computational server. If you are going to use a computation server (e.g LINUX rack mounted server) for the database and computation, you can set up the SpliceSeq Viewer on user workstation(s) and configure it to connect to the data on the compute server using the steps outlined in the previous section. One SpliceSeq database can be shared by multiple researchers.
To create SpliceSeq DB, you need MySQL Database Server 5.5.x . MySQL is often installed by default on LINUX servers or can be easily installed using ‘yum install mysqld’ or ‘apt-get install mysql-server’. Install instructions for other platforms are provided here MySQL Install .
Using a database login with permissions to create databases, add an empty database, which will be your SpliceSeq DB, to your MySQL instance and create one or more mysql ids with permissions on the new SpliceSeq DB. It is important that the database be created with the latin1 character set.
$ mysql -u root -pEnter password: ******
Welcome to the MySQL monitor. Commands end with ; or \g.
Server version: 5.0.51b-community-nt MySQL Community Edition (GPL)
mysql> CREATE DATABASE SpliceGraph CHARACTER SET latin1 COLLATE latin1_general_ci;
Query OK, 1 row affected (0.05 sec)
For users that will connect with ‘read only’ permission to analyze the data, create a MySQL users (for example, sguser) with a password (for example, sgpass), and then grant read permission on the new SpliceSeq DB to the newly created user:
mysql>GRANT SELECT ON SpliceGraph.* TO 'sguser'@'localhost' IDENTIFIED BY 'sgpass';
mysql>GRANT SELECT ON SpliceGraph.* TO 'sguser'@'%' IDENTIFIED BY 'sgpass';
You will also need a database user with full permission on the database in order analyze / load RNASeq data. Create another MySQL user (for example, sgload) with a password (for example, sg4ld!), and then grant full permission on the new SpliceSeq DB to the new user.
mysql>GRANT ALL ON SpliceGraph.* TO 'sgload'@'localhost' IDENTIFIED BY 'sg4ld!';
mysql>GRANT ALL ON SpliceGraph.* TO 'sgload'@'%' IDENTIFIED BY 'sg4ld!';
mysql>exit;
Finally, some initial tables and data must be loaded into the blank SpliceSeq DB you have just created. Download, unzip, and load the current SpliceGraphDB on the machine that is hosting your new SpliceSeq DB. Use the MySQL user ID with full database permissions defined above to load the initial data into the database.
$ unzip SpliceGraphDB.zip
$ mysql -u sgload -p SpliceGraph < SpliceGraphDB.sql
Enter password: ******
Modify the DB tab of the SpliceSeq Viewer configuration panel, as outlined in the Configuring SpliceSeq Viewer to Access the SpliceSeq DB, with the appropriate server, database, user ID, and password. If the you plan to load data from the SpliceSeq Viewer use a MySQL user ID with full database permissions. If not, configure the SpliceSeq Viewer with a user ID that only has select permissions.
Installing and Configuring SpliceSeq Analyzer
Installing SpliceSeq Analyzer
If you plan on analyzing your own RNASeq samples, you will also need SpliceSeq Analyzer.
SpliceSeq Analyzer is included in the local installation package and does not need a separate installation step. However, SpliceSeq Analyzer relies on an external alignment program Bowtie, which should be installed and configured as described in the next section.
Installing and Configuring Bowtie
The SpliceSeq Analyzer requires a Bowtie (version 1), which is used to align read data to splice graphs. Note, SpliceSeq uses the original Bowtie aligner not Bowtie 2. Also, if you are going to run sample alignments on a 64 bit computer, it will run faster if you install a 64 bit version of Bowtie.
After installing Bowtie, SpliceSeq Analyzer must be configured so that it knows where Bowtie is installed and where it may create alignment related files. On the SGAnalyzer tab of SpliceSeq Viewer’s configuration panel (File - Configuration), the BowtieExe and BowtieDBBuildExe parameters need to be set to the location where you installed Bowtie. The BowtieDBPath just needs to be set to an existing directory where SpliceSeq Analyzer can put the Bowtie databases that it generates. The ResultsDir needs to be set to a directory on the machine where temporary files can be placed while loading new samples.
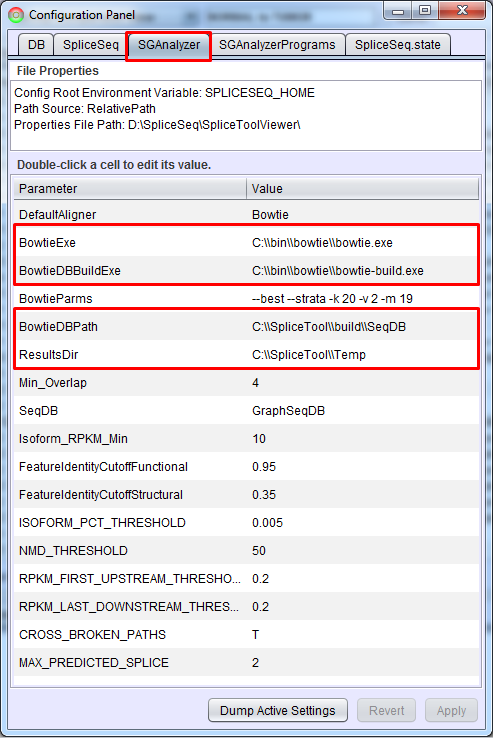
Note: If you are planning on running SpliceSeq analysis on a LINUX compute server, you can install analyzer by unzipping SpliceSeq.zip into the directory of your choice. Instead of using the GUI to configure the bowtie location, you can edit the SGAnalyzer.properties file directly. If bowtie is in the path of the user running analysis you can just specify ‘bowtie’ andbowtie-build’ for the BowtieExe and BowtieDBBuildExe parameters. BowtieDBPath and ResultsDir can be fully qualified paths or relative paths if analysis will always be started from the same directory. The directories specified by BowtieDBPath and ResultsDir must exist.
Advanced Configuration
This section briefly describes some additional configuration tabs that you may see in the Configuration Panel. These configurations are generally not meant to be adjusted by the average user. Please feel free to contact us if you have any questions.
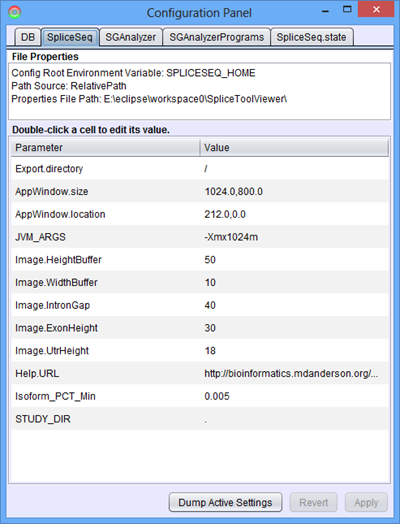
SpliceSeq
This panel contains some internal parameters used by the SpliceSeq Viewer program. The parameters that may be of interest are:
- AppWindow.size and AppWindow.location, which controls the default window size and position respectively
- Export.directory, which sets the default directory that opens up in the export table content file dialog
- JVM_ARGS, which controls the Java Virtual Machine arguments used to run the program. If a java heap overflow errors do occur, you may adjust the JVM_ARGS variable to increase the heap size. (See next section for a short list of memory-related JVM parameters)
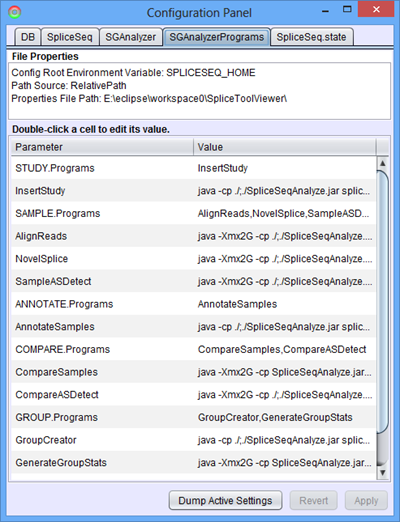
SGAnalyzerPrograms
This panel contains the list of Java programs as well as the Java Virtual Machine (JVM) command line parameters used to run each step in the data loading process. If a memory issue is encountered during data loading, one thing to try would be to alter the JVM parameters to increase heap size and thread stack size.
JVM memory related parameters:
-Xms<size> set initial Java heap size
-Xmx<size> set maximum Java heap size
-Xss<size> set java thread stack size
Also, if you wish to turn off the novel splice detection feature, you can remove “NovelSplice” from the list in SAMPLE.Programs.
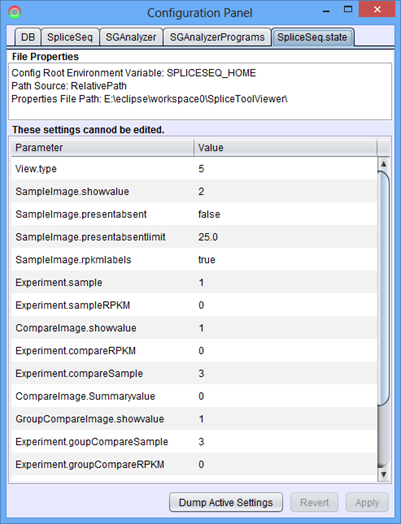
SpliceSeq.stat
The SpliceSeq.state tab is actually not a configuration file, but a cookie storing the internal states of the program. It is only used for debugging purposes, and cannot be edited within the Configuration panel.